Concept of Draft Mode
Universe MDM system uses drafts for secure work with data and data structure. Drafts create a safe environment for new changes, allow changes to accumulate and protect data from incomplete changes that could affect data integrity.
Some changes may be long-lasting, drafts also allow you to save intermediate results of the work.
Drafts are used for the following system objects:
Data model.
Record.
Matching rules
Quality Rules.
Workflows (for Standard & Enterprise Editions).
Draft entry
Working with drafts of records does not require special conditions. The record draft mechanism will be triggered when new records are created in the "Data" section. In the draft record window, the user specifies the necessary data in the record card and saves them. After the draft is published, the entry becomes an up-to-date part of the registry or directory.
To get started with a draft entry:
Open the "Data" section and select the registry/directory to which you want to add an entry.
Click on the "Create Entry" button located in the upper right corner of the screen.
As a result of the action, a draft entry window will open.
Fill in the necessary data in record cards.
Publish the draft. There are 2 available:ref:publication methods <draftconcept-publish>: simple or publication with priority. After publication, the draft is deleted.
Features:
A business process can be configured for the record publication event, which starts the record approval procedure.
Before publishing the draft, automatic validation of the modified data is performed. Publishing with errors is not possible, so they need to be corrected.
The draft recording is not intended for collaboration. When working with several users in one draft, the changes of the user who last saved and published it will be taken into account.
If the draft entry is configured with:ref:business process <addwf>, then the publication task is started. When the BP is successfully completed, a draft is published in response.
Only published records participate in consolidation, drafts do not apply to it. The same goes for the recording history - the draft is not related to it.
The functionality of cloning and comparing drafts of a record cannot be carried out.
Draft data model
A data model is a description of an information data structure that includes objects, relationships between objects, and auxiliary elements. All components of the data model are placed in several sections of the user interface.
To get started with a draft data model:
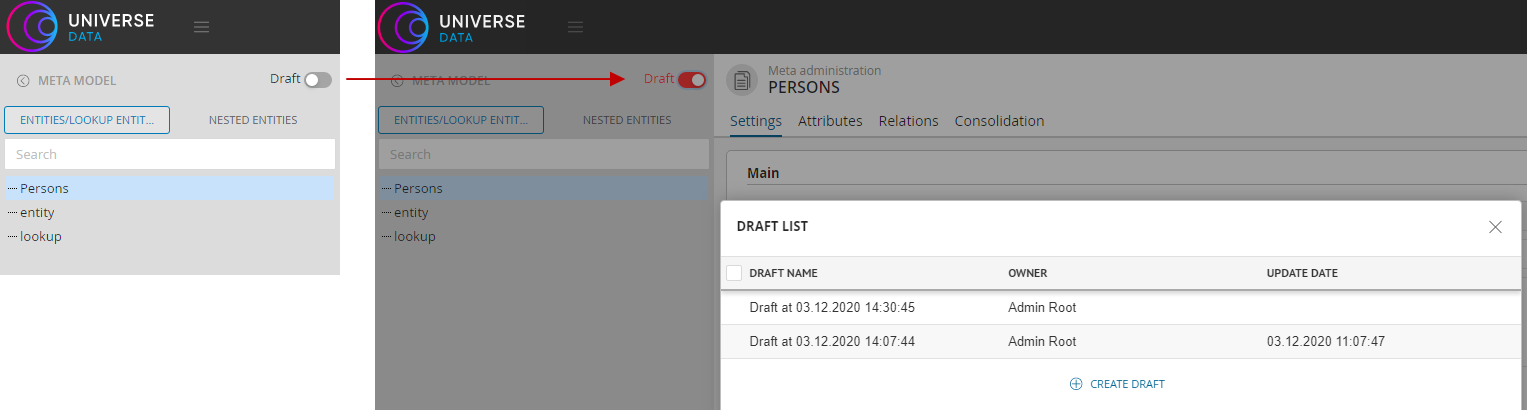
Open the "Data Model" section and click the
 "Draft" button located at the top of the registry/directories list. The change state button opens the list of drafts (Figure 1).
A list of drafts will open in the drop-down window. Create a new draft or open an existing one.
Select the registry/directory you need to work with or:ref:create a new <dmnewentity>.
After entering the data, publish the draft.
Features:
Publishing a draft increases the version number of the data model.
The draft of the data model is structurally similar to the draft method data quality and :ref:`matching rules <matching>'.
Data model import/export does not affect the data model draft.
Publishing a draft
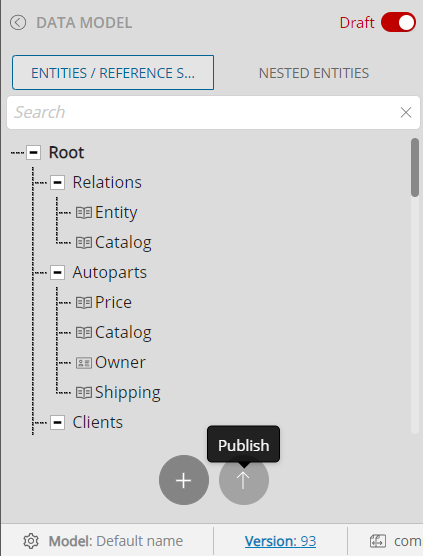
To publish a draft, click the ![]() "Publish" button located at the bottom of the list of objects (Figure 2).
"Publish" button located at the bottom of the list of objects (Figure 2).
In the window that opens, select the publication method:
Simple is used if the data model has not been changed by other users during the period of work on the draft, or has changed slightly. If you try to publish a draft after significant changes to the model, some conflicts in the model may lead to an error and stop publishing.
With priority ignores any previous changes and overwrites the model.
- alt
Switching to draft mode
Figure 1 – Switching to draft mode (using the Data Model draft as an example)
- alt
Button for publishing a draft in the "Data Model" section
Figure 2 – Draft publication button in the "Data Model" section